
Uncategorized
How to Fix Loose Sex Doll Joints: Skeleton Repair Guide
Aug
Table of contents
Loose joints can develop with regular posing: an arm may drift downward, a head may tilt, or a knee may no longer support a seated pose. Most TPE and silicone dolls use an internal metal skeleton with pivots, ball joints, or friction joints. With the right tool and access point, a loose fastener can often be tightened enough to restore stable posing without stiffening the joints.
Understanding Doll Skeleton Repair
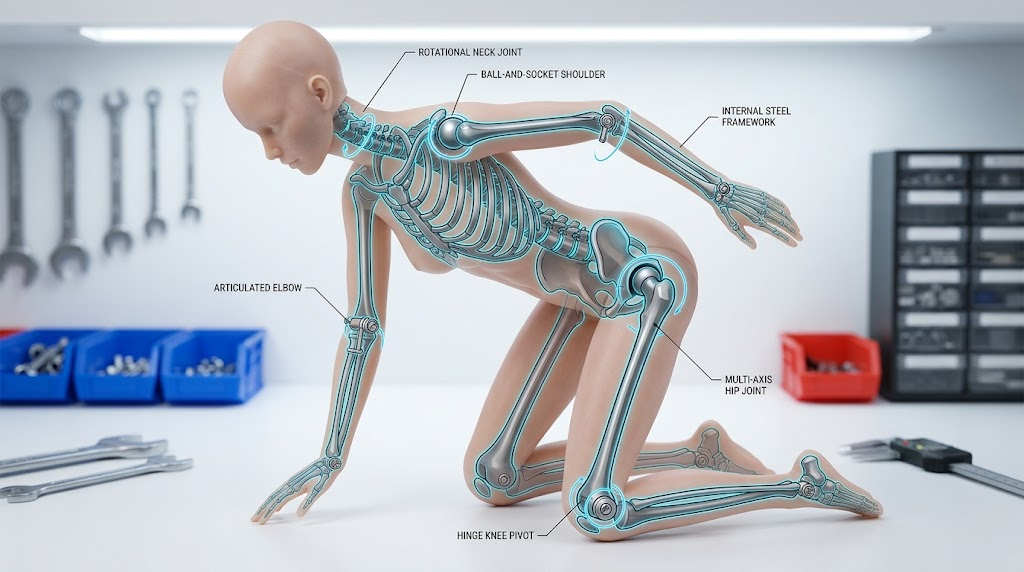
The internal frame gives the doll its poseable structure. Depending on the design, a joint may be reached through a factory access port, a removable head, or a concealed fastening point. Some skeletons are user-adjustable; others need a replacement bracket or repair service.
Many dolls use metric Allen wrenches, also called hex keys, but sizes vary. Use the wrench supplied with the doll or one that fits the socket snugly with no play. A loose-fitting tool can round the socket, while an oversized wrench can damage the access opening.
Regular attention to doll anatomy and joint maintenance can help you spot wear before a limb begins to sag.
Before you begin
Check the doll’s repair guidance and identify the access point before you start. Confirm the body material, since TPE and silicone need different adhesives and aftercare products. Support the torso and limb throughout the repair so the joint is not carrying the limb’s full weight.
Seat the hex key fully before turning. Stop when the wrench slips, spins without engaging, or needs unusual force. Those signs can point to a rounded socket, a damaged bracket, or another issue that tightening will not solve.
Tools Needed for Joint Maintenance
You only need a small, controlled repair setup.
Core tools and materials
- Metric hex/Allen wrench set
- Precision knife or scalpel for a tiny incision only when no access port is available, and the repair method permits it
- TPE/silicone-specific adhesive for sealing an incision
- Soft cloth, mild soap, renewing powder for post-repair cleaning and maintenance
- Optional: needle-nose pliers, a removable marker, and a small flashlight
Safety and setup tips
Work on a clean, flat, well-lit surface. Photograph the area before you start so you can compare the material’s placement and condition afterward.
Use the correct wrench size and keep it fully seated while turning. Factory access ports are preferable to cutting through TPE or silicone to search for hardware.
Step-by-Step Joint Adjustments
Work on one joint at a time and test its movement after each brief turn. There is no universal ¼-turn rule: thread pitch, joint design, and starting tension vary. Turn only far enough to notice a change in resistance, then test the pose.
A wrench that spins freely or a socket that feels rounded often indicates damaged hardware. More force will not repair a stripped fastener; it may make removal harder.
How to Fix a Loose Neck Bolt on a Sex Doll
The neck joint carries the head’s weight, so looseness often shows up as drooping or wobble. On some dolls, the bolt sits under the base of the head inside the neck cavity. Others use a different attachment system, so inspect the assembly before attempting an adjustment.
- Stabilize the torso and support the head.
- Expose the neck access point without pulling on the surrounding material.
- Insert the hex key fully and turn it slightly.
- Move the head through its normal range and check whether it holds position.
Stop when the head remains posed but still moves smoothly. Do not continue when the neck binds, clicks, or shows stress in the outer material.
How to Tighten Loose Shoulder Joints
A shoulder joint carries the arm’s weight, so a small loss of tension can become obvious quickly. The access hole may be near the armpit, upper chest, back, or a removable component.
Support the arm close to the shoulder before inserting the wrench. Turn the fastener just enough to increase resistance, then lift the arm forward, outward, and behind the body. It should remain where you place it without slowly dropping.
When the arm continues to sag after a limited adjustment, inspect the hardware rather than adding torque. Internal wear or a damaged joint can cause the same symptom.
How to Tighten Loose Sex Doll Knees
Knee joints take repeated loads in seated and bent-leg poses. The bracket is often located near the area below the kneecap, although the exact layout differs among skeletons.
Place the doll on a stable padded surface and support the lower leg. Find the knee access point, turn briefly, then slowly bend and straighten the leg. Check that the knee offers resistance while retaining its normal range of motion.
A knee that becomes hard to bend has been tightened too far. Ease back the last change and test it again. Do not force the leg beyond its usual range.
Sealing and Cleaning Up
Seal an incision only after the joint moves normally and holds its pose without binding. Use a repair product made for the doll’s specific material: TPE and silicone require different adhesive systems.
Keep the incision as small as possible. Apply the product exactly as directed on its label, including surface preparation, application method, and cure time. Do not stretch, wash, pose, or load the repaired area until the stated cure period has passed.
After the repair has fully cured, follow safe TPE cleaning and aftercare practices. Clean the area only with products suitable for your doll’s material, pat it dry with a lint-free towel, and use renewing powder only when the doll or repair-product instructions recommend it.
Frequently Asked Questions
Can I use super glue on a TPE sex doll?
No—standard super glue (cyanoacrylate) is not recommended for TPE doll repairs. While some industrial cyanoacrylates can bond certain thermoplastic elastomers under controlled conditions, consumer super glues cure rigid and brittle, often leaving white residue and creating a stiff seam that cracks when the material flexes. This makes them unsuitable for the repeated movement and stretching of doll joints and seams.
For TPE, use a flexible, TPE-specific repair adhesive or solvent cement designed for doll repair. These products soften and re-bond the TPE surface, preserving flexibility and reducing the risk of cracking. If you are unsure which product matches your doll’s formulation, check the manufacturer’s guidance or choose a repair kit marketed specifically for TPE sex dolls.
What is the best repair kit for TPE sex dolls?
Choose a kit that matches the material and repair type. For surface tears and small incisions, useful components may include:
- A flexible TPE adhesive or solvent cement, often supplied with a brush or toothpick applicator
- Renewing powder for post-repair finishing
- Optional color-matching pigment or patches for larger repairs
Some advanced kits also include a low-temperature heat tool for blending larger TPE repairs, but these require careful technique to avoid bubbling or melting.
TPE repair kits and accessories can be helpful, but check compatibility before applying anything. A complete kit can improve the appearance of a repair, though an invisible finish is not guaranteed. Let the product cure fully before handling, washing, or posing the area.
Why is my TPE doll sweating mineral oil?
Heat, pressure, or frequent handling can cause the surface of some TPE dolls to become oily. The exact additives vary by formulation, so it is safer to describe this as surface oil or plasticizer migration rather than assume every doll is releasing mineral oil.
Wipe the area gently with a soft cloth and use renewing powder only when it suits your doll. Contact the maker if the change is sudden, unusually heavy, sticky, or accompanied by cracking.
Final Thoughts
Use a fitted hex key, support the doll, and test the joint as you go. Stop when it holds the pose without binding; a stripped or inaccessible joint needs the right replacement hardware or repair service.